Wednesday, October 31, 2012

Triple Chocolate Scaredy Cat Cookies (GF) and Baked Apples


Happy Halloween Everyone! I don't know exactly what it is, but for some reason I have been more excited about the quirky holiday this year than ever before. However, I am the type who likes the idea of a "cute" Halloween. I am not intrigued by fear or horror or anything gruesome for that matter. I am quite a wimp when it comes to being afraid. 


When I was younger I lived in a place renowned for its trick or treating. I have some great memories of excitedly wandering around in the frigid night, dressed up in quite a unique array of homemade costumes  ranging from a pink tulle dress mimicking Glenda the Good Witch to a feather boa wrapped ensemble resembling a fluffy chicken.

But soon after moving out of the city, I learned that Halloween is much different in the countryside. I will always remember what must have been a very peculiar sight of a little girl walking down a deserted street, dressed as a mime. Since that last attempt at trick or treating, Halloween has become for me, more than anything else, a holiday that celebrates all of the things that are so special about autumn.


Among one of my absolute favorite costumes that I wore several consecutive Halloweens, was a black cat. Unfortunately I tripped on the too long tail so many times, I had to say goodbye to it. But ever since then I have been intrigued by black cats, and they seem so perfect for the occasion, I decided to make these cookies.


I love the fact that they are so chocolate-y and dark and mysterious. The frosting is almost like velvet and is such a great contrast with the crisp cookies. I used my grandmother's vintage cat cookie cutter. I think these scaredy cats make a fun and sweet treat :)

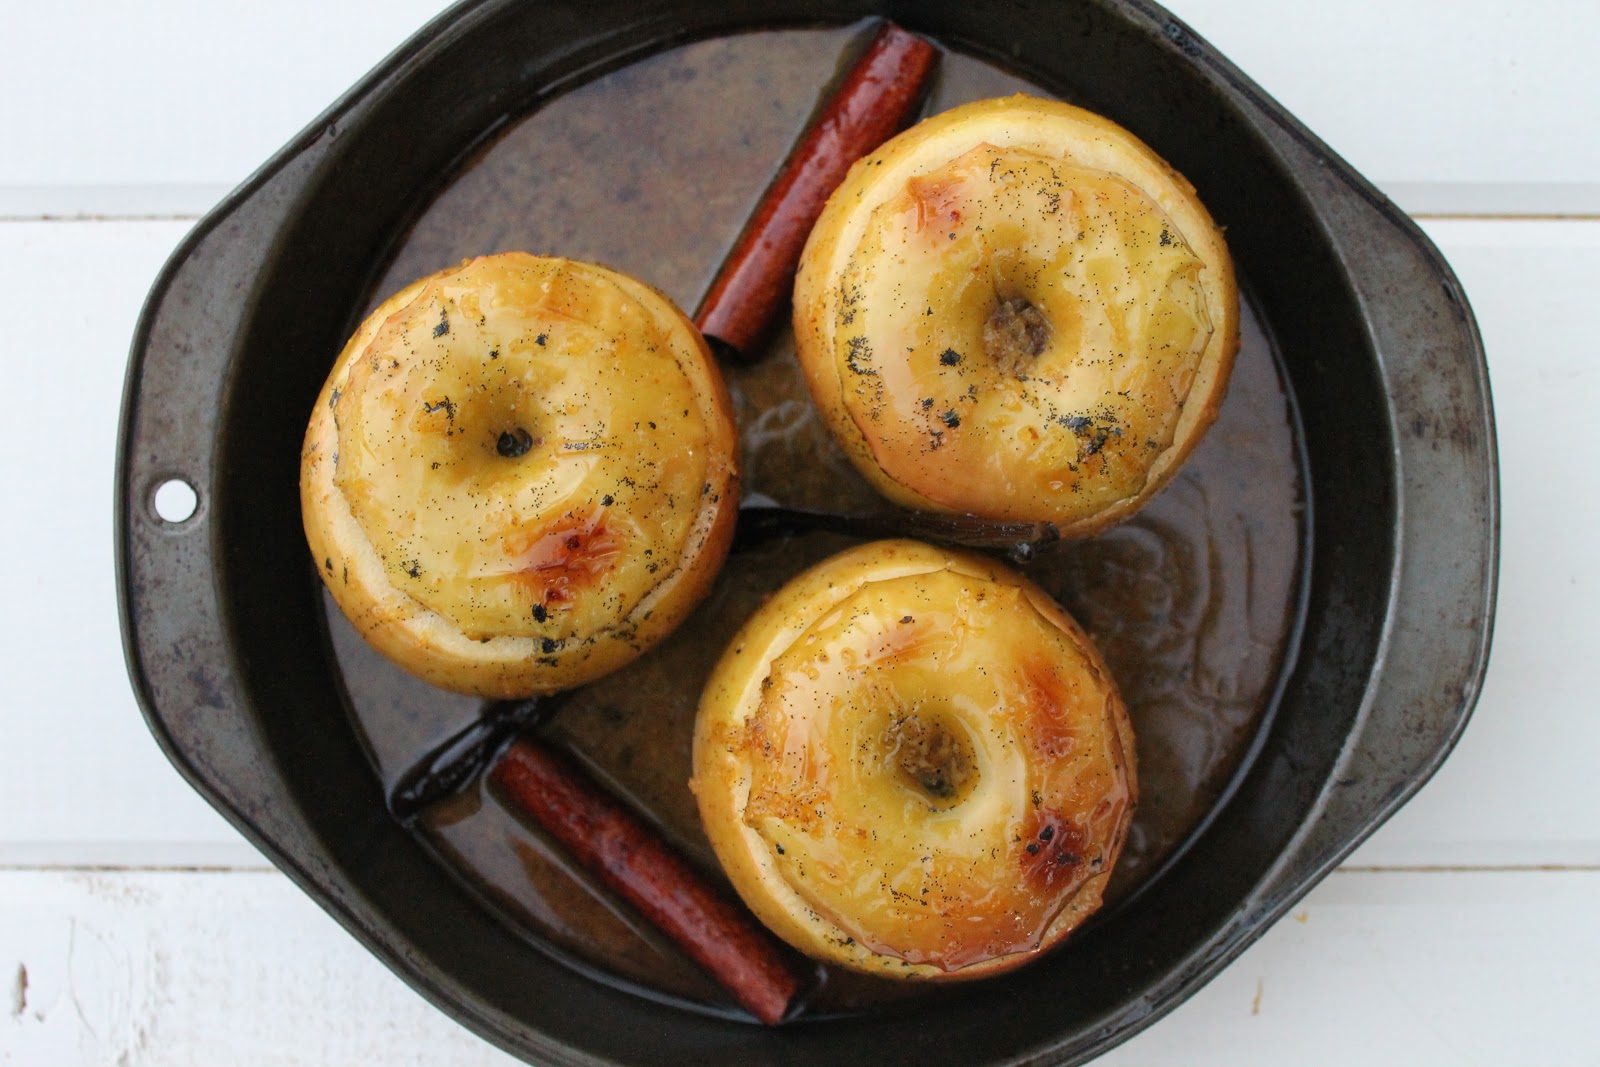
These baked apples were also fantastic. I stuffed some local Fuji apples with Hail Mary's Lemon Thyme pecans and dried sour cherries. The syrup is a slightly lemony apple cider spiced with cinnamon and vanilla bean. The addition of olive oil enriches the flavor even more.

The smell that wafts through the kitchen as the apples bake, is superb.  When they are done, they look shiny, juicy, and delicious, flecked with tiny vanilla seeds.


Triple Chocolate Scaredy Cat Cookies (GF)
makes about 2 dozen 4 inch cookies  
1 cup Jeanne's All Purpose Gluten Free Flour Blend (see Lavender Peach Crostada post)
1/4 cup unsweetened cocoa powder
1/2 teaspoon baking soda
1/4 teaspoon salt
4 ounces bittersweet chocolate, chopped
4 tablespoons unsalted butter
1/2 cup packed dark brown sugar
1 large egg

1. Whisk to combine flour blend, cocoa powder, baking soda, and salt in a bowl. In a double boiler, stir together the chocolate, butter and brown sugar until partially melted. Remove from heat. Stir until completely melted and smooth. Let cool slightly.
2. Add eggs to chocolate mixture. Beat with an electric mixer on low speed until well blended. Gradually stir in flour mixture (dough will form a ball).
3. Divide dough in half. Roll out each half on a piece of parchment to 1/4 inch thickness. Stack dough on baking sheet and chill for about 20 minutes.
4. Preheat oven to 350 degrees F. Cut out dough with a cookie cutter. Transfer shapes to a parchment lined baking sheet, 1 inch apart. Bake, rotating halfway through, until cookies are firm, 7 to 10 minutes. Transfer cookies to a wire rack to cool completely. Can store in an airtight container at room temperature for up to 5 days.   

Velvety Dark Chocolate Frosting

1 cup confectioner's sugar
1 tablespoon plus 1 1/2 teaspoons unsweetened cocoa powder
1/4 cup milk
1 ounce unsweetened or bittersweet chocolate

1.Whisk to combine sugar and cocoa in a bowl. Stir in milk and whisk until smooth. Melt the chocolate and drizzle into the frosting. Whisk again until smooth and dark.


Recipes slightly adapted from Martha Stewart Living


Baked Apples with Spices, Olive Oil, and Pecans
makes 4 servings

6 tablespoons dried sour cherries, chopped
6 tablespoons pecans, chopped
1 cup fresh apple cider
zest and juice of 1 lemon
1 vanilla bean, split and scraped
2 cinnamon sticks
4 crisp apples (I used Fuji)
4 tablespoons olive oil
2 tablespoons coarse sugar

1. In a small bowl, combine the sour cherries and pecans. Set aside.
2. In a pot, combine the apple cider, lemon zest, vanilla bean and seed, and cinnamon sticks. Bring to a boil, then remove from heat. Cover and leave to infuse for 30 minutes.
3. Preheat oven to 350 degrees F.
4. Slice the tops off of the apples, then core them. Drizzle them with lemon juice.
5. Place the apples in a baking dish and divide the stuffing mix among them. Cover them with their tops, then pour the infused juice and oil over them and sprinkle with sugar.
6. Place the apples in the oven and bake for 1 hour, or until tender, regularly drizzling with the cooking juices. Serve with yogurt or whipped cream, if you like.


Recipe adapted from La Tartine Gourmande by Beatrice Peltre via Melissa of The Traveler's Lunchbox

Monday, October 29, 2012

Halloween Souffles...Scary Stuff


I am excited to finally be posting about my second ever attempt at making souffles. It has taken me a bit longer to get this post up than I had anticipated. My first try at making these left much to be desired. I usually allow myself to settle for outcomes much less marvelous than what I imagine, but I was convinced that I could not make a souffle that had risen about a foot above the rim of the ramekin, and then fallen, creating a massive crater, look even slightly pretty.  I'll admit while my second attempt was not perfect, I was satisfied, considering what I had seen just before. Souffles really can be rather scary to make!


Back in July, in one of the very first posts on this blog, I featured my gluten free variation of a recipe for lemon and goat cheese ravioli, that I had come across in the cookbook Plenty by Yotam Ottolenghi. Ever since I bought Plenty I decided to slowly work my way through it- and I have loved every recipe I have tried thus far.

When I saw Ottolenghi's Halloween Souffle, I immediately knew I wanted to make it, but naturally I thought it would be best to wait until Halloween time. I certainly didn't want to jump the gun. It has been somewhat shocking to me how quickly time has flown by. Nearly November already, honestly?


The souffle marries a superb variety of flavors. The pumpkin and goat cheese are mild enough to let all the other ingredients shine through. In my own variation I added chopped green chile and oregano. Oregano, because I am particular about what marjoram tastes good in, as it is rather perfumey. Green chile, because I slip chile into pretty much every recipe I possibly can- and also pumpkin pairs particularly well with it :)

If you would like, drizzle a little "black olive oil" on top of the souffles for an extra Halloween-y effect. I was inspired to use it as garnish after seeing it in an inspirational quarterly magazine I enjoy, Sweet Paul.


Check back very soon! I have a couple more Halloween related goodies that I will be featuring. I am trying to squeeze in as much cooking and baking time as I possibly can. Perhaps too much... but I would never say that :)


Halloween Souffles
Serves 6 in ramekins or 4 in soup bowls

one 3/4 pound pumpkin (skin on)
olive oil
3/4 teaspoon soft brown sugar
salt
1/4 cup whole hazelnuts (skin on)
4 tablespoon unsalted butter; 2 tablespoons, melted
1 tablespoon plus 2 teaspoons sweet rice flour
1 cup plus 1 tablespoon milk
5 eggs, separated, plus 1 egg white
1/2 cup green chile, chopped and drained well
1 tablespoon fresh oregano, chopped
2 1/2 ounces goat cheese or farmer's cheese, grated
black olive oil, for serving

1. Preheat the oven to 350 degrees F. Cut the pumpkin into eighths. Scoop out and discard the seeds and fibers. Place the pumpkin pieces skin-side down in a shallow roasting tin or baking sheet. Drizzle with a little olive oil and sprinkle with the brown sugar and 1/2 teaspoon salt. Roast for 45 minutes, or until the flesh is tender. Leave to cool for a while, then scoop out the flesh and blitz it to a puree. You need exactly 4 1/4 ounces for the souffles.
2. Turn up the oven to 400 degrees F and place a baking sheet on the top shelf. Blitz the hazelnuts in a food processor until powdery. Brush the ramekins generously with the melted butter, then coat the bottoms and sides with the hazelnuts. Place the coated ramekins in the fridge.
3. Melt the 2 tablespoons butter in a large saucepan over medium heat. Stir in the flour and cook for a minute. Gradually add the milk, stirring with a wooden spoon until the sauce is thick and starts to bubble. In a large bowl mix together the 4 1/4 ounces pumpkin, egg yolks, green chile, oregano, goat cheese and 3/4 teaspoons salt. Add the sauce and stir until smooth.
4. Place the egg whites in a large, clean, stainless steel or glass bowl and whisk until they are stiff but not dry. Add a little of the egg whites to the pumpkin base and stir to loosen, then fold in the remaining egg whites, taking care to retain as much air as possible.
5. Fill the ramekins or bowls up to 3/8 inch from the top. Place the souffles in the oven, on the heated baking sheet, and bake for 10 to 14 minutes, or until golden brown and risen well. If you would like, blitz black olives and olive oil together in the food processor, to serve on top of the souffles.


Recipe adapted from Yotam Ottolenghi's Plenty

Thursday, October 25, 2012

A Woodland Inspired Feast

I decided to change up the organization of my blog a bit for this post. I thought that it would be best to be able to witness the full glory of all of the photographs together without words getting in the way :)

For me, inspiration comes from a great number of sources. This post was inspired by an article I came across in the October issue of National Geographic Magazine. The issue contained an article entitled "Once Upon A Home" which included a series of photographs taken by Kai Fagerstrom. They seemed so intriguing when I first saw them, that they prompted me to conjure up my own setting and mood for a unique meal.

Fagerstrom traveled to a desolate area in a wooded region of Finland to discover a number of abandoned cottages. He found the cottages to contain so much history. With all of the crumbling interiors and possessions of past residence still in place, the homes seemed to keep memories frozen in time. When looking at the photographs this was apparent and was so enriching.

But for Fagerstrom, one of the most intriguing things about these homes was the way that they had become inhabited by wildlife. The cottages had once again become part of the forest surrounding them and had become sanctuaries of sorts for a variety of different animals. All of the photos captured a moment with an animal using an abandoned cottage as their own home- squirrels and mice looking out from the windowsill, badgers entering through their fireplace passage, a fox peering through an old cat door.

I know I may be the only person who would ever associate these photos with a great theme for a meal, but I guess that just makes me different...

I really wanted to evoke a feeling of a "foraged" feast that is set in the heart of the woods, focused on earthy flavors and inspired by nature itself, much like the setting in Fagerstrom's photographs. I hope that I was able to accomplish this in a creative but still delicious and appealing way. I hope that you enjoy and are inspired to try making some of the tasty dishes below!


Apple, Fennel, and Hazelnut Salad with Honey Vinaigrette
serves about 4

2 bulbs fennel, thinly sliced
3 tablespoons olive oil
salt and pepper
4 cups arugula
2 small apples, sliced
1/2 cup hazelnuts
honey vinaigrette

1. Heat a medium saute pan over medium-high heat until just smoking. Add the oil and fennel and start tossing to coat. Season with salt and pepper, to taste.
2. As the fennel begins to caramelize, add a splash of water to steam for 1 minute. Remove from heat.
3. Combine arugula, apple slices, and hazelnuts in a large bowl. Stir in the fennel when it is cool. Dress salad with honey vinaigrette.

Recipe for sauteed fennel from Cheryl Smith of the Food Network
Recipe for salad from the kitchen of Cirque Du Souffle :)


Honey Vinaigrette

1/4 cup apple cider vinegar
1/4 cup olive oil
2 teaspoons honey
salt and pepper

1. Place the vinegar in a small bowl. Slowly drizzle the olive oil into the vinegar while whisking. Whisk in the honey and season with salt and pepper.

Recipe from the kitchen of Cirque Du Souffle :)


Rustic Bread Loaf (GF)

150g potato starch
35g white rice flour
25g garbanzo-fava flour
25g tapioca starch
15g buckwheat flour
10g sweet rice flour
1 teaspoon xanthan gum
1 teaspoon guar gum
1/2 teaspoon pectin
1 teaspoon sugar
3/4 teaspoon sea salt
1 teaspoon Ener-G egg replacer
2 eggs, beaten
100mL warm water (about 150 degrees F)
1 teaspoon sugar
1/2 teaspoon yeast
30mL canola oil

1. Blend all of the dry ingredients together with a whisk in a mixing bowl. Dissolve the yeast and sugar in the warm water and let it foam for a few minutes.
2. Add the eggs, yeast mixture, and oil to the flour mixture, and "knead" with a soft spatula until the dough is smooth. If the dough seems too stiff, sprinkle in a little more warm water until it is springy.
3. Cover the bowl with clingfilm and allow the dough to rise for at least 30 minutes in a warm place (I let mine rise for about 50 minutes in a slightly warm oven to create a fuller loaf). 
4. After it rises, squash the dough down and tip it out onto a baking stone covered with a piece of lightly oiled, lightly floured parchment. 
5. Gently roll the ball of dough in flour (a mix of tapioca and potato starch is good). Work in some more flour if the dough seems too loose or sticky. Stretch the surface so it is smooth, and shape it into an oval. Brush with oil and dust with more flour. Cut slits on the top of the loaf using an oiled knife.
6. Place in a cold oven and turn it on to 400 degrees F. Bake for 45-50 minutes, until the crust is nicely browned and the loaf sounds hollow when tapped. Cool on a wire rack.

Recipe from Meg of Gluten- Free Boulangerie: Real bread, without the wheat


Roasted Herbed Wild Mushroom and Dry Jack Grilled Sandwiches on Rustic Bread (GF)
makes 4 sandwiches

1 pound wild mushrooms, washed and sliced
olive oil
salt and pepper
1/4 cup chives, minced
1/4 cup marjoram, minced
butter for bread
8 slices rustic gluten free bread
8 ounces dry jack cheese

1. Heat the oven to 475 degrees F. Toss the mushrooms in a large bowl with a generous amount of olive oil, salt, and pepper.
2. Roast on a parchment lined baking sheet for 20 minutes. Toss mushrooms once, then continue to bake for 10 minutes. Transfer them to a bowl and toss with the herbs and more salt and pepper.
3. Heat a large frying pan. Butter all slices of bread on one side. Place 4 slices (butter side down) in the skillet, top with cheese, and distribute the mushroom herb mixture on top of the cheese. Place the top slices of bread on top of the cheese and mushrooms.
4. Cook until the bottom slice is slightly browned, then flip the sandwich and cook until the cheese is melted. Serve hot.

Recipe for Roasted Mushrooms with Herbs from Faith Durand of The Kitchn
Recipe for Grilled Sandwiches from the kitchen of Cirque Du Souffle :)


Nutmeg Pavlovas with Whipped Cream and Macerated Black Currants
makes 10 to 12 individual sized pavlovas

1 1/2 cups granulated sugar
1 tablespoon plus 1 1/2 teaspoons cornstarch
6 large egg whites, at room temperature
1/2 teaspoon cream of tartar
pinch of salt
1 1/2 teaspoons vanilla
1 teaspoon nutmeg

1. Preheat oven to 275 degrees F. Line a large baking sheet with parchment. In a small bowl, stir together the sugar and cornstarch.
2. In the bowl of an electric mixer, whisk together egg whites, cream of tartar, and salt. Start at low and increase speed until soft peaks form.
3. At medium-high speed, whisk in the sugar and cornstarch mixture. Whisk for a few minutes, then add the vanilla and nutmeg. At high speed, whisk until the meringue is glossy and stiff peaks form.
4. Spoon the meringues onto the baking sheet, forming 10 to 12 round mounds. Create indentations in the middle of the mounds with the back of a spoon.
5. Place the baking sheet in the oven and reduce the temperature to 250 degrees F. Bake for about 40 to 50 minutes. The pavlovas should be white, dry to the touch and only slightly cracked. If they begin to turn tan colored or crack, reduce the temperature to 225 degrees F, rotate the baking sheet, and continue to bake.
6. Let the pavlovas cool completely. Top with a dollop of whipped cream and macerated black currants just before serving. (Pavlovas can be stored in an airtight container for up to a week).

Recipe very slightly adapted from Shuna Lydon of Eggbeater


Macerated Black Currants

1 1/2 cups black currants
2 tablespoons superfine sugar
2 tablespoons creme de cassis

1. Place half the black currants in a bowl with half the sugar and the cassis. Mix well and leave to macerate.
2. Put the rest of the currants in a small pan with the remaining sugar and 1 tablespoon of water. Heat, stirring until the sugar has dissolved, then remove from the heat.
3. When the currant sauce is cool, mix with the macerated currants.

Recipe from Richard Corrigan of Riverford Organic Farms

Tuesday, October 23, 2012

Risotto Bianco and Autumn Whites


One of the obvious reasons that autumn is so beautiful is because of all of the color. But throughout this month I have also noticed a lot of incredible contrasting whites and blacks. I feel like it is the perfect time to capture at least one of the shades that tends to go unnoticed with all of the glory of the bright yellows and reds lighting up so many trees.


I realized this would also be the perfect time to try out a risotto recipe that I have had bookmarked for quite some time. Back in September I decided to make preserved lemons, but hadn't really any idea what to use them in when they were finished preserving.


Then I found this risotto recipe in a beautiful issue of Canal House Cooking.


Way back in August, I was so lucky to be able to attend a workshop hosted by Christopher Hirsheimer and Melissa Hamilton of the Canal House (http://www.thecanalhouse.com/) They are such well known and accomplished figures of the cooking, food writing and photography world that I felt very privileged to be able to meet them and receive their tips and learn some of their techniques.


The workshop was very inspiring as are their lovely cookbooks. The issue in which the risotto recipe is featured is entitled La Dolce Vita. It outlines Hirsheimer and Hamilton's adventures and experiences with food while living in a farmhouse in Tuscany. It also offers images that give a feel for the Italian culinary culture that they discovered and far too many recipes that I want to try to recreate!


This recipe is very simple yet the flavor and texture of the risotto is wonderful. All of the recipes in La Dolce Vita seem to take foods in their most pure form and transform them into delicious dishes. I love recipes that really celebrate fresh ingredients in unique ways.


I am always amazed that risotto can seem so creamy and rich without any cream or milk. In this particular recipe I really enjoy the contrast of the bright flavor and fragrance of the preserved lemon and the slightly nutty rice. It is a great comfort dish yet it seems kind of elegant.


I don't know about you, but it is so hard for me to not be completely in love with autumn right now. As I am writing this post, I am sitting outside listening to the little birds flitting through the grape vines. A group of sand hill cranes, with their surreal beauty, just glided overhead, and the sun is filtering through the changing leaves, creating the perfect golden glow. What could be better than this?


Preserved Lemon

5 lemons
kosher salt
1 cinnamon stick
3 bay leaves
6 black peppercorns

1. Soak the lemons in water for 2 to 3 days, changing water daily. Quarter them lengthwise, without cutting through the bases. Place 2 teaspoons of salt in the bottom of a preserving jar. Pack each lemon slice with more salt and place in the jar. Press them to release their juices. Distribute the spices between the lemon slices. Cover with extra lemon juice. Seal and let sit for at least 20 days. Shake the jar daily to distribute salt and juice. To use, rinse the lemons and discard pulp.


Recipe very slightly adapted from dazzling delightful delicious


Risotto Bianco with Preserved Lemon
makes about 4 servings

4 tablespoons butter
1 small onion, finely chopped
2 tablespoons finely chopped preserved lemon rind
1 cup arborio, carnaroli, or vialone nano rice
1/2 cup grated parmigiano-reggiano
salt and pepper

1. Fill a medium pot with about 5 cups of water and bring to a gentle simmer over medium heat. Reduce heat to low and keep the water hot.
2. Melt 3 tablespoons of the butter in a heavy deep saute pan over medium- high heat. Add the onions and cook, stirring with a wooden spoon, until soft and translucent, about 3 minutes. Stir the preserved lemon rind into the onion then add the rice, stirring until everything is coated with butter.
3. Add  1/2  cup of the simmering water, stirring constantly, to keep the rice from sticking to the bottom of the pan. Push any rice that crawls up the sides back down into the liquid. When the rice has absorbed all of the water, add another 1/2 cup of water. Continue this process until you have added most of the water, about 20 minutes.
4. Taste the rice, it is ready when it is tender with a firm center. The fully cooked risotto should be moist but not soupy. Add the parmigiano and remaining 1 tablespoons of butter, and stir until it has melted into the rice.  Taste, and season with salt and pepper, if needed.


Recipe from Canal House Cooking: La Dolce Vita  (volume No. 7) by Christopher Hirsheimer and Melissa Hamilton